Changing the percentage is as simple as going into Power Options in the Control Panel, and changing plan settings. However, some users might find that after changing the plan settings, the new percentage level they choose doesn’t save. This tends to occur as a result of OEM (Original Equipment Manufacturer) software that manages power settings. If you are experiencing this problem, the following method should resolve the problem and allow you to change the critical battery percentage level.
Method 1: Remove OEM Power Management
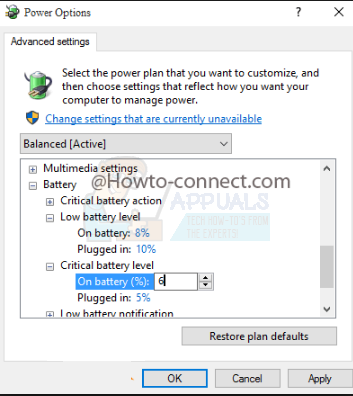
First of all, you need to find what OEM Power Management system your computer has installed. Press the Windows and X keys on your keyboard, and click Control Panel. Choose Programs and then click Uninstall a program. You will be presented with a window that contains all installed programs on your computer. The power management system your laptop is running, if any, will depend on the manufacturer of your machine. A Dell machine will be running Dell Power Manager. VAIO machines use VAIO Power Management Software. Samsung laptops may also run Samsung Battery Manager. Search the installed programs for anything that includes the manufacturer name of your laptop, and the words power manager or battery manager. Once you locate it, highlight it, and press Uninstall which is at the top of the list. When you are shown a window that informs you the uninstall has been completed, reboot your computer. Once restarted, once again press the Windows and X keys, click Control Panel and choose Power Options. Under Selected plan, click Change plan settings, which will take you to your current plan settings. At the bottom, you’ll see Change advanced power settings. Click this, and in the window that pops up, scroll and expand the Battery entry. In the expanded list, you will see Critical battery action, which you can expand and change what happens when you receive the critical battery notification. Below this, you will see Critical battery level, which you should expand to change the percentage at which you receive the notification. Here you can amend the percentage with the On battery and Plugged in options. Once you have made your decision, click Apply and OK. If this does not work, try method 2.
Method 2: Command Prompt
Ensuring that you are logged into an admin account on your computer, press the Start button on your task bar, select Run and enter cmd. This will take you to a black screen (command prompt), where you should enter the following code. Replace
Press Enter on your keyboard, and this should change your critical battery percentage level.
FIX: Battery Percentage Won’t Increase on iPhone 5How to Record Audio Above Certain Levels on AndroidPC Sales Outpace Pre-Pandemic Levels Despite Overall Decline, Mac Growth Remains…How to Fix Critical Windows Error 0x00000019?